Loading...
> docs/configuration
Instance Settings and Configuration
6 min read
Instances
Last updated April 05, 2026
Overview
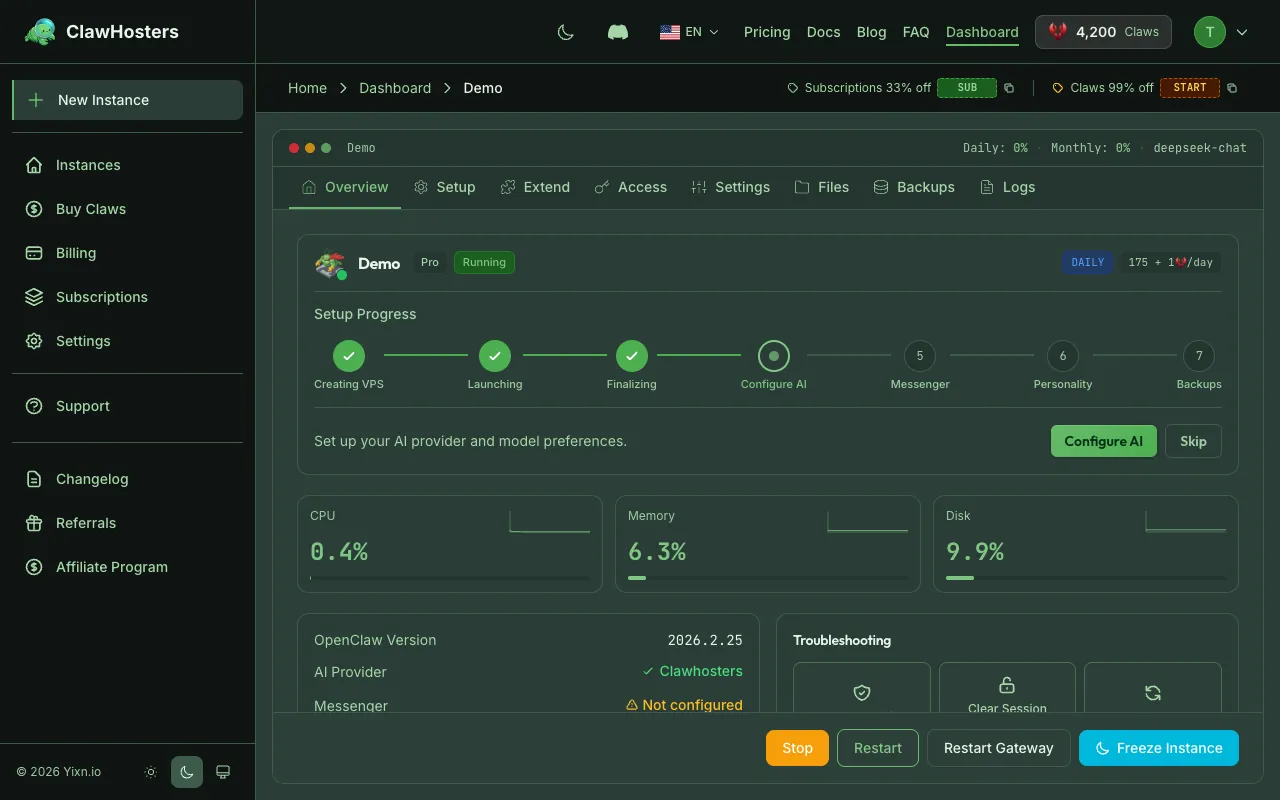
After creating an instance, you can configure its AI model, messaging channels, web access, and SSH access. All configuration is done through the instance dashboard.
This page covers the settings available for each instance and how to change them.
LLM Configuration
The LLM (Large Language Model) configuration controls which AI provider and model your instance uses to process messages.
Setting Up the LLM
During the setup wizard (or later from Instance Settings):
- Open the instance dashboard
- Go to LLM Settings (or the setup wizard step 1)
- Select a provider
- Enter your API key
- Optionally select a specific model
- Save
Supported Providers
| Provider | API Key Format | Example Model |
|---|---|---|
| Anthropic | Starts with sk-ant- |
claude-sonnet-4-5 |
| OpenAI | Starts with sk- |
gpt-4o |
| OpenAI Codex | Starts with sk- |
codex-mini-latest |
| OpenRouter | Starts with sk-or- |
anthropic/claude-sonnet-4-5 |
Starts with AIza |
gemini-2.0-flash | |
| DeepSeek | Starts with sk- |
deepseek-chat |
| Groq | Starts with gsk_ |
llama-3.3-70b-versatile |
| Mistral | Varies | mistral-large-latest |
| xAI (Grok) | Starts with xai- |
grok-3 |
| ZAI Coding | Varies | zai-coder |
| NVIDIA | Varies | nvidia/llama-3.1-nemotron-70b-instruct |
If you do not select a model, a default for your provider is used automatically. The models shown above are examples and may change over time.
Changing the LLM Later
You can update the LLM provider and API key at any time from the instance settings page. The change takes effect within a few seconds.
LLM Add-on (Managed Mode)
If you subscribe to a managed LLM add-on, ClawHosters provides the API key and handles billing for AI usage. You can choose between tiers:
- Eco uses lower-cost models, suitable for basic tasks
- Standard uses mid-range models for general use
- Premium uses top-tier models for demanding workloads
With the BYOK (Bring Your Own Key) option, you use your own API key and pay your provider directly.
Add-on configuration is available at Dashboard → Add-ons.
Telegram Configuration
Connect a Telegram bot to your instance so users can interact with your AI assistant through Telegram.
Setting Up Telegram
- Create a bot through @BotFather on Telegram
- Copy the bot token
- Open the instance dashboard → Messenger Settings (or setup wizard step 2)
- Paste the bot token
- Optionally enter the bot username (without the @ symbol)
- Choose a DM policy
- Save
DM Policy
The DM policy controls who can message your bot:
| Policy | Behavior |
|---|---|
| Pairing (default) | The instance owner must pair with the bot first through the OpenClaw web interface. Only approved users can interact. |
| Open | Anyone who finds the bot can send it messages. Less restrictive but suitable for public-facing bots. |
Pairing Your Bot
If you use pairing mode (recommended):
- Go to the instance dashboard
- Click the Pair Telegram button
- Follow the instructions to link your Telegram account
- Once paired, the bot responds to your messages
Discord Configuration
Connect a Discord bot to your instance.
Setting Up Discord
- Create a bot in the Discord Developer Portal
- Enable the Message Content Intent in the bot settings
- Copy the bot token
- Open the instance dashboard → Messenger Settings
- Paste the bot token
- Choose a DM policy (pairing or open)
- Save
The pairing process works the same as Telegram. The instance owner must pair first if using pairing mode.
Slack Configuration
Connect a Slack app to your instance.
Setting Up Slack
- Create a Slack app at api.slack.com/apps
- Configure the required permissions and enable Socket Mode
- Copy both the Bot Token (starts with
xoxb-) and the App Token (starts withxapp-) - Open the instance dashboard → Messenger Settings
- Enter both tokens
- Choose a DM policy
- Save
Both tokens are required for Slack integration to work.
WhatsApp Configuration
WhatsApp connects through a QR code pairing process in the OpenClaw web interface.
Setting Up WhatsApp
- Open the instance dashboard
- Go to Messenger Settings
- Enable WhatsApp
- A QR code appears in the OpenClaw web interface
- Scan the QR code with WhatsApp on your phone
- The connection is established
QR codes expire after a short time. If it expires, refresh to get a new one.
WhatsApp allows only one linked device per phone number for the web interface. Disconnect any existing linked sessions first.
Web Access (Gateway)
Every running instance has a web interface (the OpenClaw Gateway) accessible through a URL.
Access Methods
There are two ways to access the web interface:
- Token URL. A URL with an authentication token appended:
https://{subdomain}.clawhosters.com/?token={token} - HTTP Basic Auth. Standard username/password authentication using your email and a generated password
Viewing Credentials
- Open the instance dashboard
- Click View Credentials in the quick actions section
- Copy the Gateway URL or HTTP auth credentials
Regenerating the Password
If you need a new HTTP auth password:
- Open the instance dashboard
- Click Regenerate Password
- The old password stops working immediately
The Gateway token is deterministic and does not change.
SSH Access
SSH access lets you connect directly to the underlying VPS for advanced debugging or customization.
Enabling SSH
- Open the instance dashboard
- Click SSH Access in the quick actions
- Enter your public SSH key (ed25519 or RSA format)
- Confirm that you understand the implications
- SSH access is enabled
Connecting via SSH
text
ssh -p 2222 root@{ip_address}
Replace {ip_address} with the IP shown in your instance dashboard.
Important: SSH and Support
Enabling SSH access sets your instance to limited support status. This means:
- You can still open support tickets, but we may decline requests for issues caused by manual server modifications
- The change cannot be reversed
- Support for billing, account, and infrastructure questions remains fully available
Only enable SSH if you are comfortable managing the server yourself.
Instance Details
The instance dashboard shows these read-only details:
| Field | Description |
|---|---|
| Tier | Budget, Balanced, or Pro |
| Subdomain | Your instance's web address |
| IP Address | The VPS IP (changes if paused and resumed, or frozen and unfrozen) |
| Status | Current instance state |
| Billing Mode | Daily (Claws) or Monthly (Stripe) |
| Daily Cost | Claws cost per day based on tier |
| Created | When the instance was created |
Resource Monitoring
The instance dashboard displays resource usage indicators:
| Metric | Description |
|---|---|
| CPU | Current CPU utilization percentage |
| Memory | Current RAM usage percentage |
| Disk | Storage usage percentage |
These metrics update every 5 minutes. If any metric consistently reaches high levels, consider upgrading to a higher tier.
| Tier | CPU Cores | RAM | Storage |
|---|---|---|---|
| Budget | 2 vCPU | 4 GB | 40 GB |
| Balanced | 4 vCPU | 8 GB | 80 GB |
| Pro | 8 vCPU | 16 GB | 160 GB |
Related Documentation
- Instance Overview. Instance statuses, lifecycle, and tiers
- Starting and Stopping Instances. Power management and billing impact
- SSH Access to Your Instance. Detailed SSH setup, security, and support implications
- LLM Add-on. Managed AI models and BYOK configuration
- Troubleshooting Common Issues. Solutions for frequent problems
Related Documentation
Quickstart Guide
Before You Start You need a ClawHosters account. If you haven't signed up yet, head to clawhoste...
Instance Overview
What Is an Instance? An instance is a dedicated OpenClaw server running on ClawHosters. It is yo...
Multi-channel Setup
Using Multiple Channels at Once Your OpenClaw instance supports connecting multiple channels sim...
