Loading...
> docs/account-setup
Account Setup
3 min read
Getting Started
Last updated March 12, 2026
Creating Your Account
Head to clawhosters.com and click Get Started or Sign Up. You have two options:
Sign up with Google: One click, no password needed. Your Google account email becomes your ClawHosters login.
Sign up with email: Enter your email address, pick a password (minimum 8 characters), and confirm it. Passwords are hashed and stored securely.
Before submitting, you'll see two checkboxes:
- Marketing emails: Optional, checked by default. We send product updates and new feature announcements, nothing more. Uncheck if you'd rather not receive them.
- Terms of Service: Required. You cannot create an account without accepting the ToS.
Click Sign Up and you're in. New accounts include a free trial so you can explore the platform before committing to a paid plan.
Verifying Your Email
After registration, ClawHosters sends a confirmation email to the address you signed up with. Check your inbox for a message from noreply@clawhosters.com.
Click the confirmation link in the email. This activates your account and signs you in automatically. You land directly on your dashboard.
If the email doesn't arrive within a few minutes:
- Check your spam/junk folder
- Make sure you typed your email correctly during signup
- Visit the resend confirmation page to request a new link
The confirmation link is valid for a limited time. If it expires, use the resend page to get a fresh one.
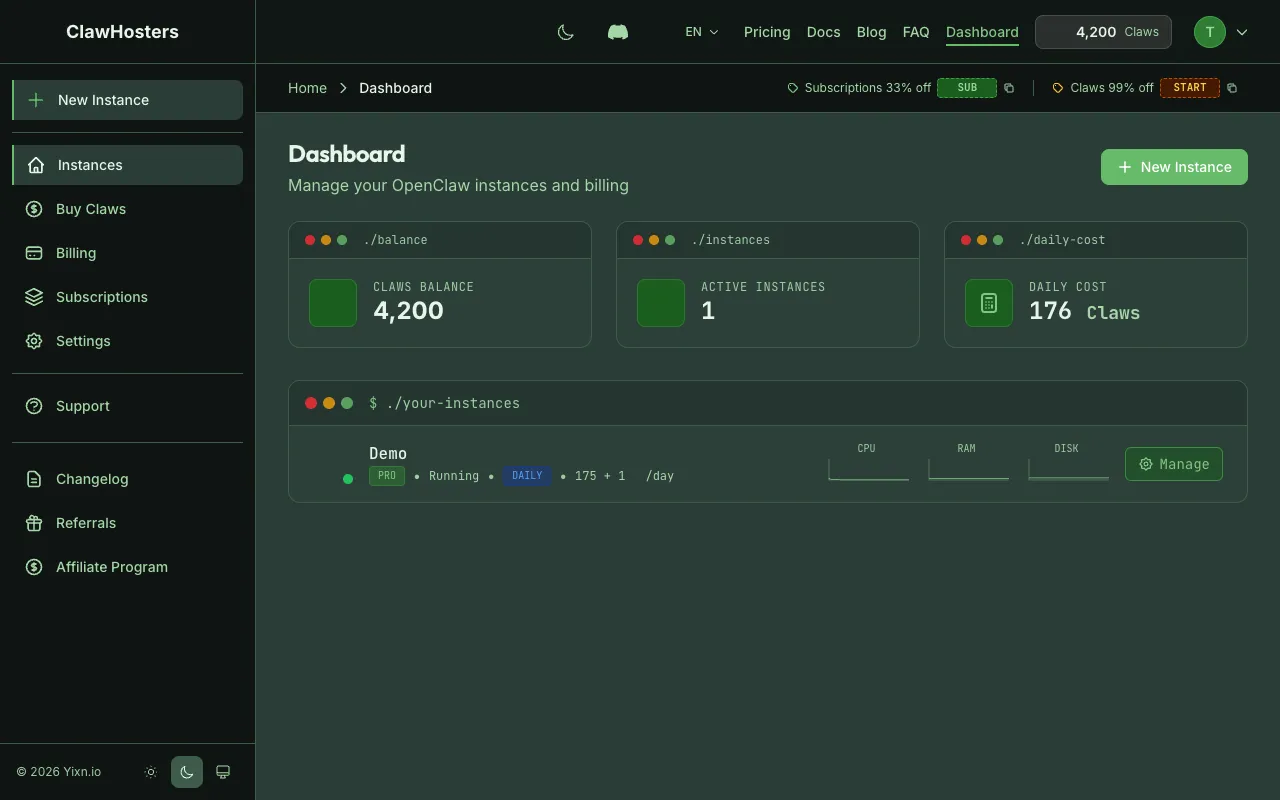
Your Dashboard
After confirming your email, you'll see the main dashboard. This is your home base for everything on ClawHosters.
Stats at a glance:
- Claws Balance: Your current credits. New accounts start at zero. You'll need to add Claws before creating a daily-billed instance.
- Active Instances: How many of your instances are currently running.
- Daily Cost: The total Claws spent per day across all running instances.
Instances section:
Since you just created your account, this section is empty. You'll see a prompt to deploy your first instance. When you're ready, the Creating Your First Instance guide walks through the process step by step.
Dashboard Navigation
The sidebar (or hamburger menu on mobile) gives you access to:
- Instances: Instance overview and quick stats
- Buy Claws: Purchase credit packages
- Billing: View transaction history and manage payment methods
- Settings: Update your email, password, or notification preferences
- Referrals: Invite others and earn bonus Claws
- Support: Submit a ticket if you run into issues
Account Settings
From the Settings page you can:
- Change your email: Requires re-verification via confirmation email
- Change your password: Enter your current password plus the new one
- Notification preferences: Toggle marketing email opt-in
- Delete your account: Permanently removes your account and all data. Running instances are stopped and deleted. This action cannot be undone.
Security
ClawHosters stores passwords using bcrypt hashing. We never store plaintext passwords.
Google OAuth accounts don't have a ClawHosters password at all. Authentication happens entirely through Google's servers.
All sessions use secure, HTTP-only cookies. Sessions expire after inactivity.
Next Steps
- Buy Claws to fund your account for daily billing
- Create your first instance to deploy an OpenClaw server
- Connect Telegram to chat with your instance from your phone
Related Documentation
Authentication and Access Control
How Authentication Works in ClawHosters ClawHosters uses different authentication methods depend...
Quickstart Guide
Before You Start You need a ClawHosters account. If you haven't signed up yet, head to clawhoste...
What is ClawHosters?
Managed OpenClaw Hosting ClawHosters is a managed hosting platform for OpenClaw AI assistants. Y...
